How to Scan Documents With Your Phone Into a Clean PDF

In this guide
- Photo vs scan: what makes the difference
- How to scan with Scan to PDF
- Taking photos that scan well
- Scanning different kinds of documents
- After scanning: searchable, small and safe
- Scan to PDF vs JPG to PDF
- A complete example: an insurance claim on the go
- Organising scanned documents so you can find them again
- Why phone scans sometimes look worse than they should
- Phone scanning vs a real scanner
- Frequently asked questions
- In short
Few people own a scanner any more, yet we are asked to "scan and send" documents all the time: signed forms, ID cards, receipts for expense claims, certificates for applications, handwritten assignments, medical prescriptions for insurance.
Your phone's camera is more than good enough to replace a scanner, if you know how to use it. The difference between a dark, crooked photo of a page on a kitchen table and a clean, white, straight "scan" comes down to a few habits and the right tool. This guide covers both.
Photo vs scan: what makes the difference
A real scanner gives you a page that is:
- Flat and straight, a perfect rectangle with no perspective.
- Cropped to the edges of the paper, with no table, fingers or background.
- Evenly lit, with white paper and dark text, and no shadows.
- Sharp, with readable small print.
- Small, especially in black and white or greyscale.
A plain phone photo usually has none of those qualities. Scan to PDF fixes most of them automatically, and good photo habits take care of the rest.
How to scan with Scan to PDF
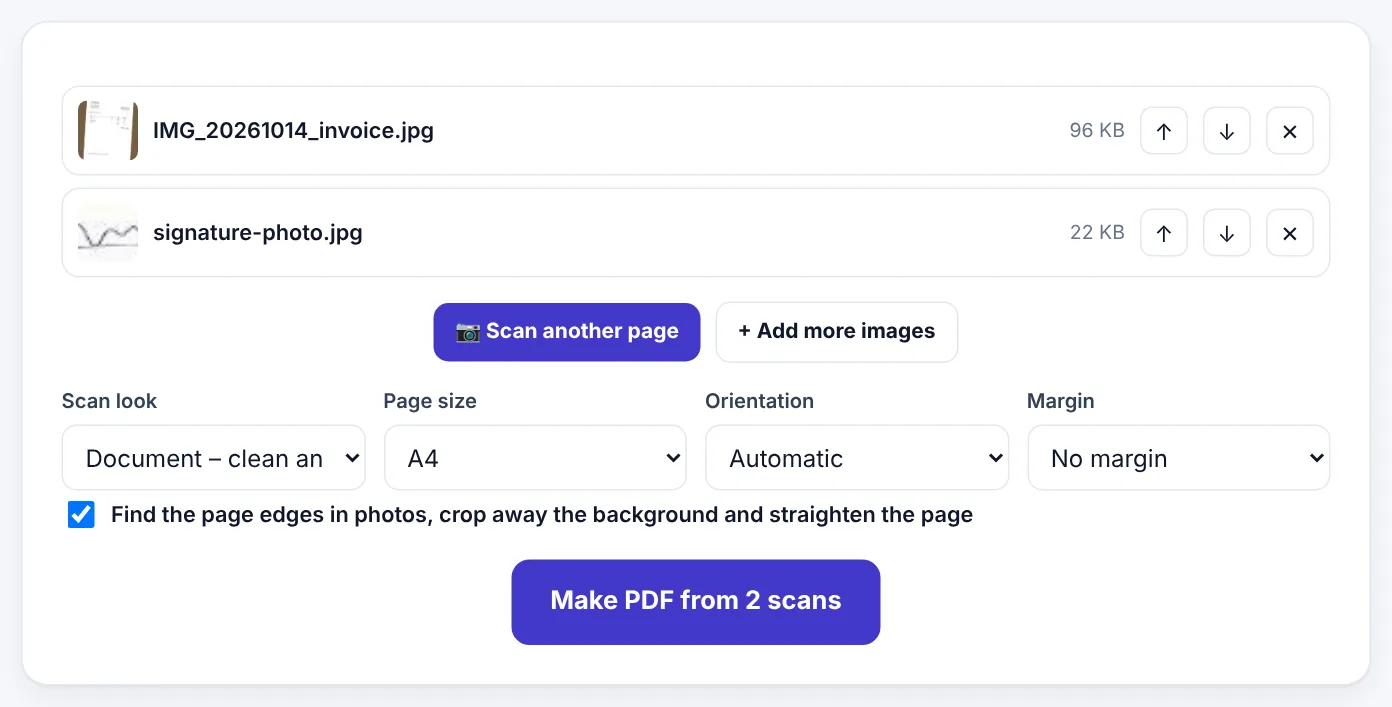
Scan to PDF works in your phone's browser; your pages are processed on your phone and are not uploaded.
- Open Scan to PDF on your phone.
- Press the camera button to photograph a page, or choose photos you already took from your gallery.
- Press Scan another page for each additional page. Use the arrows to fix the order and ✕ to remove a bad shot.
- Choose the Scan look (explained below), the Page size (A4 or US Letter), Orientation and Margin.
- Keep Find the page edges switched on, so the background is cropped away and the page is straightened.
- Press Make PDF and download.
Automatic cropping and straightening
When Find the page edges is on, Scan to PDF looks for the sheet of paper in each photo, finds its four corners, and then crops away the background and corrects the perspective. A page photographed at a slight angle becomes a straight rectangle, just like a flatbed scan.
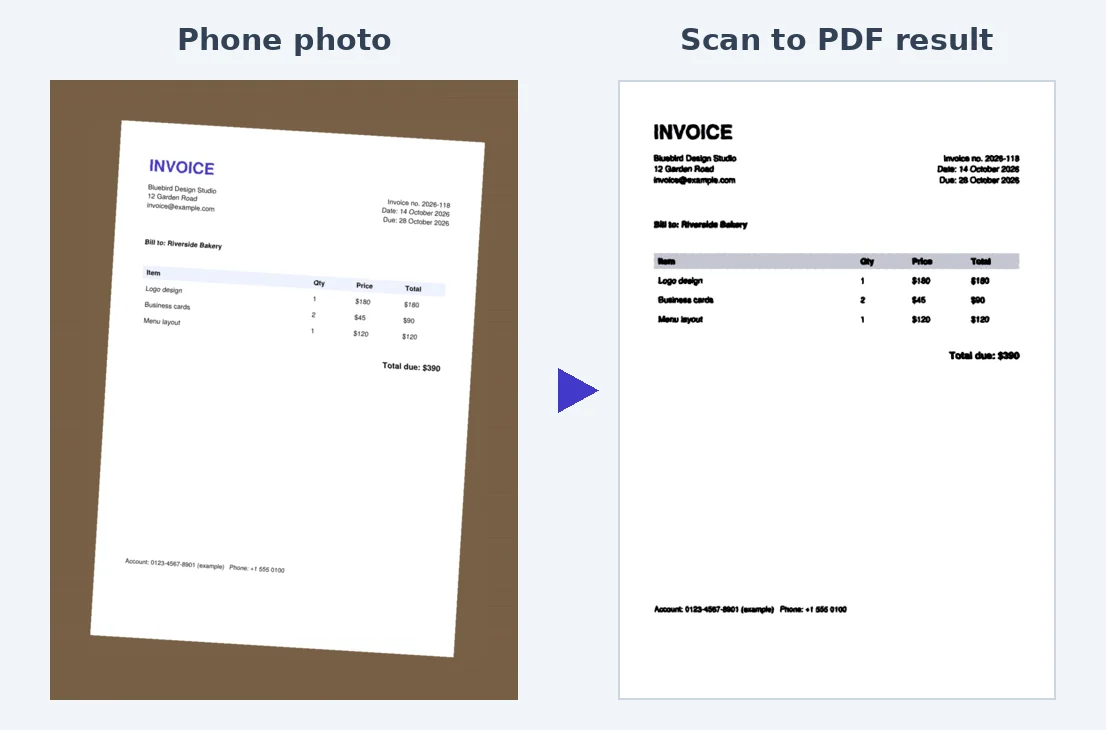
It works best when the page stands out clearly from what is behind it, such as white paper on a dark table. If no clear page is found, for example a photo of a whiteboard or a page on a white bedsheet, the photo is kept as it is, so nothing is ever cropped by mistake.
Choosing the scan look
- Document – clean and sharp: whitens the paper, darkens the text and removes the grey cast phone photos often have. The best choice for most documents.
- Black & white: pure black text on pure white. Perfect for typed or handwritten text with no photos; makes very small files.
- Grayscale: keeps shades of grey. Good for pages with stamps, signatures in light ink, pencil, or photos.
- Original colours: leaves colours as they are. Use for colourful documents such as certificates, maps, or ID cards where colour matters.
Taking photos that scan well
The tool does a lot, but a good photo always gives a better result. These habits take seconds:
- Put the paper on a dark, plain surface. A dark table, a folder or a piece of dark cloth makes the page edges easy to find.
- Use soft daylight. Stand near a window. Avoid direct sun, which causes harsh shadows and glare.
- Turn off the flash. It creates a bright hot spot and reflections on glossy paper.
- Watch for your own shadow. Hold the phone slightly off to the side, or lift the page so light falls on it evenly.
- Hold the phone parallel to the page, directly above it. The straighter the photo, the sharper the text after correction.
- Fill most of the frame, but keep all four corners of the page visible with a little background around them.
- Tap the screen on the text to focus before taking the picture.
- Hold still. Rest your elbows on the table or breathe out as you tap. Blur ruins small print.
- Flatten folded or curled pages. Put a book on them for a minute, or hold the corners down with coins.
Scanning different kinds of documents
Multi-page documents
Photograph the pages in order and check the list before making the PDF. Number the pages with a pencil on the back first if they are loose and easily mixed up.
ID cards and small documents
Place the card on a dark surface and fill much of the frame with it. Photograph front and back as two pages. If a form wants both sides on one page, ask whether two pages are acceptable (they usually are). Use Original colours so photos and holograms look natural.
Receipts
Long, thin receipts photograph best on a dark surface, flattened with something heavy at each end. Use Grayscale or Black & white for small files. Scan them promptly; thermal-paper receipts fade over time.
Handwritten notes and assignments
Black & white gives crisp, readable pages, as long as you wrote in dark ink. For pencil or coloured ink, use Grayscale.
Books and bound documents
Press the book open gently and photograph one page at a time, holding the phone straight above each page. Curved pages near the spine are the hardest part; photographing slightly from the outer side helps.
Glossy certificates and photos
Glossy paper reflects light. Tilt the page slightly away from the window or move it until the reflection disappears from the screen, then shoot.
Try Scan to PDFFree, no sign-up, and your file never leaves your device.Open tool →

After scanning: searchable, small and safe
Make it searchable with OCR
A scan is a picture of words. To search it, copy text from it or convert it to Word, run it through OCR PDF. It reads the text (English, Urdu, Hindi and Arabic) and adds an invisible text layer, while the page looks the same.
Keep it small
Scan to PDF already produces efficient files, especially in Black & white and Grayscale. If an upload form has a strict limit, run the PDF through Compress PDF.
Protect sensitive scans
Scans of ID cards, bank documents and medical papers deserve care. Add a password with Protect PDF before emailing, and delete the original photos from your gallery afterwards so they are not backed up or shared by accident.
Scan to PDF vs JPG to PDF
Both turn pictures into PDFs. The difference is what they are tuned for:
| Scan to PDF | JPG to PDF | |
|---|---|---|
| Best for | Photos of paper documents | Photos, artwork, screenshots |
| Finds page edges and straightens | Yes | No |
| Scan look (whiten paper, sharpen text) | Yes | No |
| Opens the camera directly | Yes | Uses existing photos |
| Accepts iPhone HEIC photos | Yes | Via other image tools |
Use JPG to PDF when you want photos to stay exactly as they are.
A complete example: an insurance claim on the go
Bilal has a minor car repair covered by insurance. The insurer's app asks for "clear scans" of the repair invoice (two pages), the payment receipt, his driving licence (front and back) and the police report (three pages), each as a separate PDF under 5 MB.
- He lays each document on the dark dashboard mat in daylight by the car window.
- Invoice: in Scan to PDF he takes two photos, one per page, keeps the Document look and Find the page edges, and makes
Repair-Invoice.pdf. - Receipt: a long thermal receipt. He flattens it with two coins, chooses Grayscale so faint print stays visible, and makes
Payment-Receipt.pdf. - Licence: two photos, front and back, with Original colours so the photo and hologram look natural:
Driving-Licence.pdf. - Police report: three pages with Black & white for small, crisp files:
Police-Report.pdf. - He checks each file by opening it on his phone and zooming into the smallest text.
- All four PDFs are under 1 MB, so no compression is needed. He uploads them in the app.
Ten minutes, no scanner, no trip to a shop, and the insurer receives documents that are as easy to read as office scans.
Organising scanned documents so you can find them again
Once you start scanning everything, a little organisation saves a lot of searching:
- Name files by date and content:
2026-10-21-Repair-Invoice.pdf. Dates in year-month-day order sort correctly. - Use a few clear folders: Identity, Home, Car, Health, Work, Tax. Fewer folders are easier to keep tidy.
- Make important scans searchable with OCR PDF, so a search for "warranty" or a supplier's name finds them years later.
- Keep a backup of important documents in a second place, such as a private cloud folder or an external drive.
- Shred the paper only when you are sure the scan is good and you are allowed to keep only a copy. Some documents, such as original certificates and legal papers, should always be kept on paper.
Why phone scans sometimes look worse than they should
If your scans keep coming out grey, blurry or skewed, the cause is usually one of these:
| Problem | Likely cause | Fix |
|---|---|---|
| Grey or yellow paper | Dim or warm indoor light | Use daylight near a window; choose Document look |
| Blurry text | Camera moved, or focus on background | Tap the text to focus; brace your elbows |
| Page edges not found | Paper on a white or busy surface | Use a dark, plain surface |
| Bright spot in the middle | Flash, or glossy paper reflecting a lamp | Turn off flash; tilt the page slightly |
| Dark shadow across the page | Your head or phone blocking light | Shoot from the side of the light source |
| Curved lines near the edge | Paper not flat | Press it flat or hold corners down |
Phone scanning vs a real scanner
| Phone with Scan to PDF | Flatbed scanner | |
|---|---|---|
| Cost | Free, using the phone you have | A device to buy and maintain |
| Speed for a few pages | Very fast | Slower to set up |
| Image quality for text | Very good with good light | Excellent, very consistent |
| Fragile or bound items | Easy, no pressing | Better for very flat, even pages |
| Where it works | Anywhere | At the desk |
| Colour accuracy | Depends on light | Consistent |
For everyday documents a phone is more than enough. A flatbed still wins for archival scanning of photos and artwork where perfect colour matters.
Frequently asked questions
Is a phone scan good enough for official documents?
For most uses, yes: job applications, visa uploads, insurance claims, school forms and expense reports regularly accept phone scans. A clean, straight, readable scan is what matters. Some offices still require original paper documents in person.
What resolution should I use?
Your phone's normal camera resolution is plenty. Scan to PDF keeps enough detail for printing at normal size while keeping files manageable.
Can I scan without the internet?
Once the page has loaded, scanning and PDF creation happen on your phone, so they keep working if your connection drops.
Why is my scan grey instead of white?
The light was too dim or uneven. Choose the Document look, and next time photograph near a window in daylight.
The page edges were not found. What now?
Put the page on a darker surface, make sure all four corners are visible, and take the photo again. Or switch Find the page edges off and crop the photo in your gallery app first.
Can I scan a whole book?
You can, page by page. For long books, scan in sessions of 20–30 pages, make a PDF for each session, then join them with Merge PDF. Respect copyright: scanning books you own for personal use is different from sharing scans of copyrighted books.
How do I scan both sides of a page?
Photograph the front, turn the page over and photograph the back, then continue. Check the order in the list before making the PDF.
In short
Dark background, soft daylight, phone held flat, all four corners in the frame: take those four habits into every scan. Then let Scan to PDF find the page, straighten it and clean it up, run OCR when you need searchable text, and compress or protect the result as needed. Your phone becomes a better scanner than most people have at the office.
Tools used in this guide
 OCR PDF
 Compress PDF
 JPG to PDF
Keep reading
 Online FormsHow to Compress a PDF to 50 KB, 100 KB, 200 KB or 500 KB
Online forms say "maximum 100 KB" or "PDF under 500 KB". Here is how to get your PDF under any limit – from 50 KB to 1 MB – while keeping it readable, on a phone or computer.
4 min read PDF GuidesHow to Change the Background Color of a PDF (Free, Online)
Change a white PDF to cream, mint, light blue or any colour in under a minute – on your phone or computer, without Adobe Acrobat and without uploading the file.
4 min read Online Forms"Online Application Document Checklist: Photos, Scans, Signatures and File Sizes"
A practical checklist for job, university, exam, visa and government portals - preparing photos, signatures and scanned documents in the right format and size, naming files, and avoiding last-minute upload errors.
9 min read